
LaserPro Tutorial Videos & Tech Tips
![]()
LaserPro Video Tutorials
Visit LaserPro’s Laser Engraving & Cutting Playlist on YouTube for all the latest videos available!
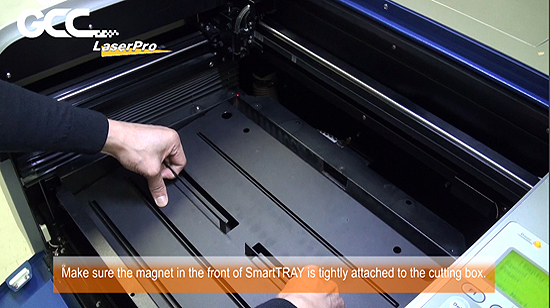
C180II SmartTRAY™ Optimizes Ventilation Efficiently
| GCC, a global forefront equipment-manufacturing provider in the visual communication industry, is glad to introduce SmartTRAY™ for its LaserPro C180II laser engravers. |
| There is no troublesome installation process but extraordinarily optimized ventilation structure and aerodynamic designs. SmatTRAYTM even provides air ventilation all over the working area, directing the dust to the downward ventilation for immediate removal. SmartTRAYTM is the best pal when working with MDF, rubber, wood, paper, and other materials . |
 |
|
To see is to believe: http://youtu.be/Gmd135Xx678
For more information, call us at 1-800-338-2238 or email moreinfo@TECedu.com. |
Using Inventor with GCC Laser Engravers
Download this step-by-step illustrated guide to learn how to use Autodesk Inventor® with your GCC Laser Engraver!
Using Inventor with GCC Laser Engravers (PDF)
Using Adobe Illustrator with GCC Laser Engravers
Download this step-by-step illustrated guide to learn how to use Adobe Illustrator with your GCC Laser Engraver!
Using Illustrator with GCC Laser Engravers (PDF)
How to select a lens for use in a GCC Laser Engaver
How to select a lens for use in a GCC Laser Engaver (PDF)
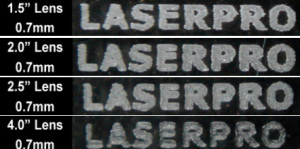
GCC offers four different focal-length lenses, the 1.5”, 2.0”, 2.5”, and 4.0” for different applications. The numbered descriptions signify the distance of where the passed-through beam light will converge. For example, when a beam of light passes through a 2.0” focus lens, the light beam will converge at a 2.0” distance, resulting in a concentration of energy at that spot.
The 1.5” lens is best when used for engraving of very fine details.
The 2.0” & 2.5“ lenses are good for normal engraving and cutting of up-to 10mm thick acrylic.
The 4.0” lens is good for cutting thicknesses of 10mm and above acrylic.
The resulting spot sizes from the lenses are listed in the chart below:

Engraving effects achieved with the different lenses:
To put a lens into the laser:
- Identify the focal length of the lens – e.g. 1.5” 2.0” 2.5” 4.0”
- Place lens correctly in keyed seat in carriage (remove/replace cover)
- Initialize (power-on) machine normally
- Press F4 on the Empty File screen
- Select Machine Settings
- Select the option Select Lens
- Select the lens focal length and press F4 to save
- Go back to Machine Settings
- Select Adjust Autofocus or Tune Autofocus option
- Position Autofocus probe above object to be lasered and press Autofocus
- Manually measure the distance from the autofocused object to the bottom of the lens and make sure it matches (approximately) the focal length of the lens. You may need to temporarily remove the carriage lens cover to view the lens position.